通过 Stackdriver 将日志导出到 BigQuery、GCS、Pub/Sub
如何通过 Stackdriver 将 Istio 访问日志导出到 BigQuery、GCS、Pub/Sub 等不同的接收器。
这篇文章展示了如何将 Istio 日志指向 Stackdriver 并将这些日志导出到各种配置的接收器,例如 BigQuery、Google Cloud Storage(GCS) 或 Cloud Pub/Sub。在这篇文章的最后,可以从喜欢的地方(如 BigQuery、GCS 或 Cloud Pub/Sub)对 Istio 数据进行分析。
Bookinfo 示例应用程序在整个任务中用作示例应用程序。
开始之前
在集群中 安装 Istio 并部署应用程序。
配置 Istio 导出日志
Istio 使用 logentry 模板 导出日志。这里指定了可用于分析的所有变量。它包含源服务、目标服务、auth 指标(即将实现……)等信息。以下是示意图:
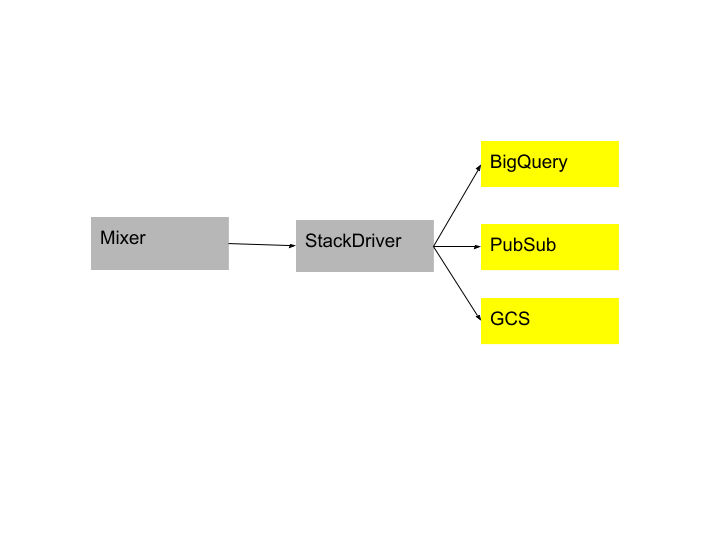
Istio 支持将日志导出到 Stackdriver,而 Stackdriver 又可以配置为将日志导出到喜欢的接收器,如 BigQuery、Pub/Sub 或 GCS。请按照以下步骤设置喜欢的接收器,首先导出日志,然后在 Istio 中使用 Stackdriver。
设置各种日志接收器
所有接收器的通用设置:
- 为项目启用
Stackdriver Monitoring API。 - 确保配置的接收器的
principalEmail具有对项目写入的权限和日志管理员角色的权限。 - 确保已设置
GOOGLE_APPLICATION_CREDENTIALS环境变量。请按照此处的说明进行设置。
BigQuery
创建 BigQuery 数据集作为日志导出的目标。- 记录数据集的 ID。这里需要设置 Stackdriver 处理程序。它的格式为
bigquery.googleapis.com/projects/[PROJECT_ID]/datasets/[DATASET_ID] - 给
接收器授权:cloud-logs@system.gserviceaccount.com。它具有 IAM 中的 BigQuery Data Editor 的角色。 - 如果使用
Google Kubernetes Engine,请确保在集群上启用了bigqueryScope。
Google Cloud Storage (GCS)
创建 GCS 存储桶,希望导出日志到 GCS 中。- 记录存储桶的 ID。这里需要配置 Stackdriver。它的形式为
storage.googleapis.com/[BUCKET_ID]。 - 给
接收器授权:cloud-logs @ system.gserviceaccount.com。它具有 IAM 中的 Storage Object Creator 的角色。
Google Cloud Pub/Sub
创建主题,希望导出日志到 Google Cloud Pub/Sub 中。- 记录主题的 ID。这里需要配置 Stackdriver。它的形式为
pubsub.googleapis.com/projects/[PROJECT_ID]/topics/[TOPIC_ID]。 - 给
接收器授权:cloud-logs @ system.gserviceaccount.com。它具有 IAM 中的 Pub/Sub Publisher 角色。 - 如果使用
Google Kubernetes Engine,请确保在集群中启动了pubsubScope。
设置 Stackdriver
必须创建 Stackdriver 处理程序,将数据导出到 Stackdriver。Stackdriver 处理程序的配置在 此处 描述。
保存如下的 yaml 文件为
stackdriver.yaml。并替换<project_id>, <sink_id>, <sink_destination>, <log_filter>为相应的值。apiVersion: "config.istio.io/v1alpha2" kind: stackdriver metadata: name: handler namespace: istio-system spec: # 设置 pushInterval 值。默认值是每分钟一次,不设置使用默认值。 # pushInterval: 1m # 必须设置 Stacldriver 适配器 project_id 的值。 project_id: "<project_id>" # apiCredentials 和 apiKey 必须设置之一;首选方法是`appCredentials`,它对应于 Google 应用程序默认凭据。 # 如果没有提供,我们使用默认应用凭据。 # appCredentials: # apiKey: # serviceAccountPath: # 描述如何将 Istio 日志映射到 Stackdriver。 logInfo: accesslog.logentry.istio-system: payloadTemplate: '{{or (.sourceIp) "-"}} - {{or (.sourceUser) "-"}} [{{or (.timestamp.Format "02/Jan/2006:15:04:05 -0700") "-"}}] "{{or (.method) "-"}} {{or (.url) "-"}} {{or (.protocol) "-"}}" {{or (.responseCode) "-"}} {{or (.responseSize) "-"}}' httpMapping: url: url status: responseCode requestSize: requestSize responseSize: responseSize latency: latency localIp: sourceIp remoteIp: destinationIp method: method userAgent: userAgent referer: referer labelNames: - sourceIp - destinationIp - sourceService - sourceUser - sourceNamespace - destinationIp - destinationService - destinationNamespace - apiClaims - apiKey - protocol - method - url - responseCode - responseSize - requestSize - latency - connectionMtls - userAgent - responseTimestamp - receivedBytes - sentBytes - referer sinkInfo: id: '<sink_id>' destination: '<sink_destination>' filter: '<log_filter>' --- apiVersion: "config.istio.io/v1alpha2" kind: rule metadata: name: stackdriver namespace: istio-system spec: match: "true" # 缺省 match 为 true actions: - handler: handler.stackdriver instances: - accesslog.logentry ---创建配置
$ kubectl apply -f stackdriver.yaml
stackdriver "handler" created
rule "stackdriver" created
logentry "stackdriverglobalmr" created
metric "stackdriverrequestcount" created
metric "stackdriverrequestduration" created
metric "stackdriverrequestsize" created
metric "stackdriverresponsesize" created
访问示例应用程序。 对于
Bookinfo示例,请使用浏览器访问http://$GATEWAY_URL/productpage或发出以下命令:$ curl http://$GATEWAY_URL/productpage验证日志是否正在通过 Stackdriver 流向配置的接收器。
- Stackdriver:导航到项目的
Stackdriver Logs Viewer,查看 “GKE Container” -> “Cluster Name” -> “Namespace Id”,查看 Istio 访问日志。 - BigQuery:导航到项目的
BigQuery Interface,在接收器的数据集中找到一个前缀为accesslog_logentry_istio的表。 - GCS:导航到项目的
Storage Brower,在接收器的桶中找到一个名为accesslog.logentry.istio-system的桶。 - Pub/Sub:导航到项目的
Pub/Sub 主题列表,在接收器的主题中找到accesslog主题。
了解发生了什么
上面的 Stackdriver.yaml 文件配置了 Istio 将访问日志发送到 Stackdriver,然后添加了一个接收器配置,将日志导出。具体如下:
添加一个
stackdriver类型的处理程序:apiVersion: "config.istio.io/v1alpha2" kind: stackdriver metadata: name: handler namespace: <your defined namespace>在
spec上增加logInfospec: logInfo: accesslog.logentry.istio-system: labelNames: - sourceIp - destinationIp ... ... sinkInfo: id: '<sink_id>' destination: '<sink_destination>' filter: '<log_filter>'
在上面的配置中,sinkInfo 包含有关日志导出到所需接收器的信息。有关如何填写不同接收器的更多信息,请参阅 此处。
为 Stackdriver 添加规则
apiVersion: "config.istio.io/v1alpha2"
kind: rule
metadata:
  name: stackdriver
  namespace: istio-system spec:
  match: "true" # 缺省 match 为 true
actions:
- handler: handler.stackdriver
  instances:
  - accesslog.logentry
清理
删除新的 Stackdriver 配置:
$ kubectl delete -f stackdriver.yaml如果不打算任何后续任务,请参阅
Bookinfo cleanup指令关闭应用程序。
日志导出的可用性
导出到 BigQuery 只需几分钟(可以认为是瞬间完成的),不过 GCS 要延迟 2 至 12 小时,而 Pub/Sub 则几乎没有延迟。
Share this blog on social!


