使用外部 MongoDB 服务
描述了一个基于 Istio 的 Bookinfo 示例的简单场景。
在使用外部 TCP 服务博文中,我描述了网格内的 Istio 应用程序如何通过 TCP 使用外部服务。在本文中,我将演示如何使用外部 MongoDB
服务。您将使用 Istio Bookinfo 示例应用程序,它的书籍评级数据保存在 MongoDB 数据库中。您会将此数据库部署在集群外部,并配置 ratings
微服务使用它。您将学习控制到外部 MongoDB 服务流量的多种选择及其利弊。
使用外部 ratings 数据库的 Bookinfo
首先,在您的 Kubernetes 集群外部建立一个 MongoDB 数据库实例以保存书籍评级数据。然后修改 Bookinfo 示例应用程序使用该数据库。
建立 ratings 数据库
在这个任务中您将建立一个 MongoDB 实例。您可以使用任何 MongoDB 实例;我使用 Compose for MongoDB。
为
admin用户的密码设置一个环境变量。为了避免密码被保存在 Bash 历史记录中,在运行命令之后,请立即使用 history -d 将其从历史记录中删除。$ export MONGO_ADMIN_PASSWORD=<your MongoDB admin password>为需要创建的新用户(即
bookinfo)的密码设置环境变量,并使用 history -d 将其从历史记录中删除。$ export BOOKINFO_PASSWORD=<password>为您的 MongoDB 服务设置环境变量
MONGODB_HOST和MONGODB_PORT。创建
bookinfo用户:$ cat <<EOF | mongo --ssl --sslAllowInvalidCertificates $MONGODB_HOST:$MONGODB_PORT -u admin -p $MONGO_ADMIN_PASSWORD --authenticationDatabase admin use test db.createUser( { user: "bookinfo", pwd: "$BOOKINFO_PASSWORD", roles: [ "read"] } ); EOF创建一个 collection 来保存评级数据。以下命令将两个评级都设置为
1,以便在 Bookinfo ratings service 使用数据库时提供视觉验证(默认 Bookinfo ratings 为4和5)$ cat <<EOF | mongo --ssl --sslAllowInvalidCertificates $MONGODB_HOST:$MONGODB_PORT -u admin -p $MONGO_ADMIN_PASSWORD --authenticationDatabase admin use test db.createCollection("ratings"); db.ratings.insert( [{rating: 1}, {rating: 1}] ); EOF检查
bookinfo用户是否可以获取评级数据:$ cat <<EOF | mongo --ssl --sslAllowInvalidCertificates $MONGODB_HOST:$MONGODB_PORT -u bookinfo -p $BOOKINFO_PASSWORD --authenticationDatabase test use test db.ratings.find({}); EOF输出应该类似于:
MongoDB server version: 3.4.10
switched to db test
{ "_id" : ObjectId("5b7c29efd7596e65b6ed2572"), "rating" : 1 }
{ "_id" : ObjectId("5b7c29efd7596e65b6ed2573"), "rating" : 1 }
bye
Bookinfo 应用程序的初始设置
为了演示使用外部数据库的场景,请首先运行一个安装了 Istio 的 Kubernetes 集群。然后部署 Istio Bookinfo 示例应用程序并应用默认 destination rules 和改变 Istio 到 blocking-egress-by-default 策略。
此应用程序从 ratings 微服务获取书籍评级(1 到 5 的数字)。评级以星标形式显示每条评论。ratings 微服务有几个版本。在下一小节中,请部署使用 MongoDB
作为 ratings 数据库的版本。
本博文中的示例命令适用于 Istio 1.0。
作为提醒,这是 Bookinfo 示例应用程序的端到端架构。

在 Bookinfo 应用程序中使用外部数据库
部署使用 MongoDB 数据库的 ratings 微服务(ratings v2):
$ kubectl apply -f @samples/bookinfo/platform/kube/bookinfo-ratings-v2.yaml@
serviceaccount "bookinfo-ratings-v2" created
deployment "ratings-v2" created
为你的 MongoDB 设置
MONGO_DB_URL环境变量:$ kubectl set env deployment/ratings-v2 "MONGO_DB_URL=mongodb://bookinfo:$BOOKINFO_PASSWORD@$MONGODB_HOST:$MONGODB_PORT/test?authSource=test&ssl=true" deployment.extensions/ratings-v2 env updated将所有到 reviews service 的流量路由到它的 v3 版本,以确保 reviews service 总是调用 ratings service。此外,将所有到
ratingsservice 的流量路由到使用外部数据库的 ratings v2。通过添加两个 virtual services 来为以上两个 services 指定路由。这些 virtual service 在 Istio 发布包中
samples/bookinfo/networking/virtual-service-ratings-mongodb.yaml有指定 。 重要: 请确保在运行以下命令之前应用了默认的 destination rules。$ kubectl apply -f @samples/bookinfo/networking/virtual-service-ratings-db.yaml@
更新的架构如下所示。请注意,网格内的蓝色箭头标记对应于我们添加的 virtual service。根据 virtual service,流量将被发送到 reviews v3 和 ratings v2。

请注意,MongoDB 数据库位于 Istio 服务网格之外,或者更确切地说是在 Kubernetes 集群之外。服务网格的边界使用虚线标记。
访问网页
确认 ingress IP 和端口之后,访问应用程序的网页。
由于您尚未配置 egress 流量控制,所以 Istio 会阻止到 MongoDB 服务的访问。这就是为什么您当前不能看到评级的星标,只能看到 “Ratings service is currently unavailable” 的信息:
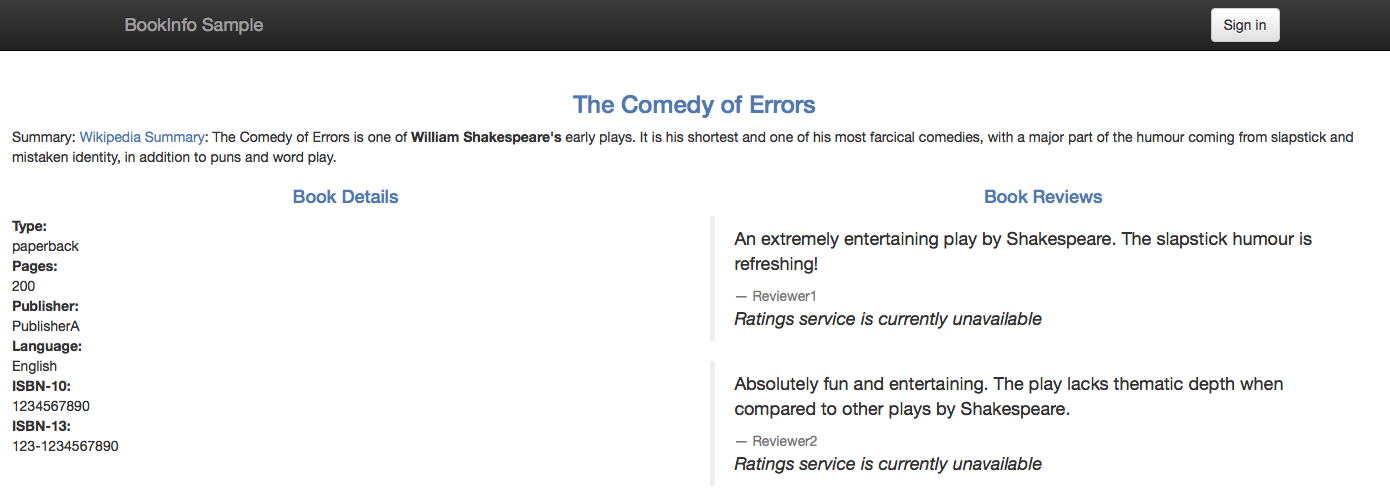
在以下部分中,您将使用不同的 Istio egress 控制选项,配置对外部 MongoDB 服务的访问。
TCP 的 egress 控制
由于 MongoDB 协议运行在 TCP 之上,您可以像控制到其余 TCP 服务的流量一样控制到 MongoDB 的 egress 流量。为了控制 TCP 流量,您必须指定一个 CIDR 表示的 IP 块,该 IP 块包含 MongoDB 的地址。需要注意的是,有时候 MongoDB 主机的 IP 并不稳定或无法事先得知。
在 MongoDB IP 不稳定的情况下,可以以 TLS 方式控制 egress 流量,或绕过 Istio sidecar 直接路由流量。
获取 MongoDB 数据库实例的 IP 地址。一种选择是使用 host 命令。
$ export MONGODB_IP=$(host $MONGODB_HOST | grep " has address " | cut -d" " -f4)
在没有 gateway 的情况下控制 TCP egress 流量
如果您不用通过 egress gateway 定向流量,例如不要求所有流量都通过 gateway 流出网格时,请遵循以下部分的说明。或者,如果您确实希望通过 egress gateway 定向流量,请继续阅读通过 egress gateway 定向 TCP egress 流量。
定义一个网格外 TCP service entry:
$ kubectl apply -f - <<EOF
apiVersion: networking.istio.io/v1alpha3
kind: ServiceEntry
metadata:
  name: mongo
spec:
  hosts:
  - my-mongo.tcp.svc
  addresses:
  - $MONGODB_IP/32
  ports:
  - number: $MONGODB_PORT
    name: tcp
    protocol: TCP
  location: MESH_EXTERNAL
  resolution: STATIC
  endpoints:
  - address: $MONGODB_IP
EOF
请注意,protocol 被指定为
TCP而不是MONGO,因为如果 MongoDB 协议运行在 TLS 之上时,流量可以加密。如果加密了流量,该加密的 MongoDB 协议就不能被 Istio 代理解析。如果您知道使用的是未加密的 MongoDB 协议,可以指定 protocol 为
MONGO,从而使 Istio 代理产生 MongoDB 相关的统计数据。还要注意,当指定 protocolTCP时,配置不是特定于 MongoDB 的,对于其余使用基于 TCP 协议的数据库同样适用。刷新应用程序的网页。应用程序现在应该显示评级数据而非错误:
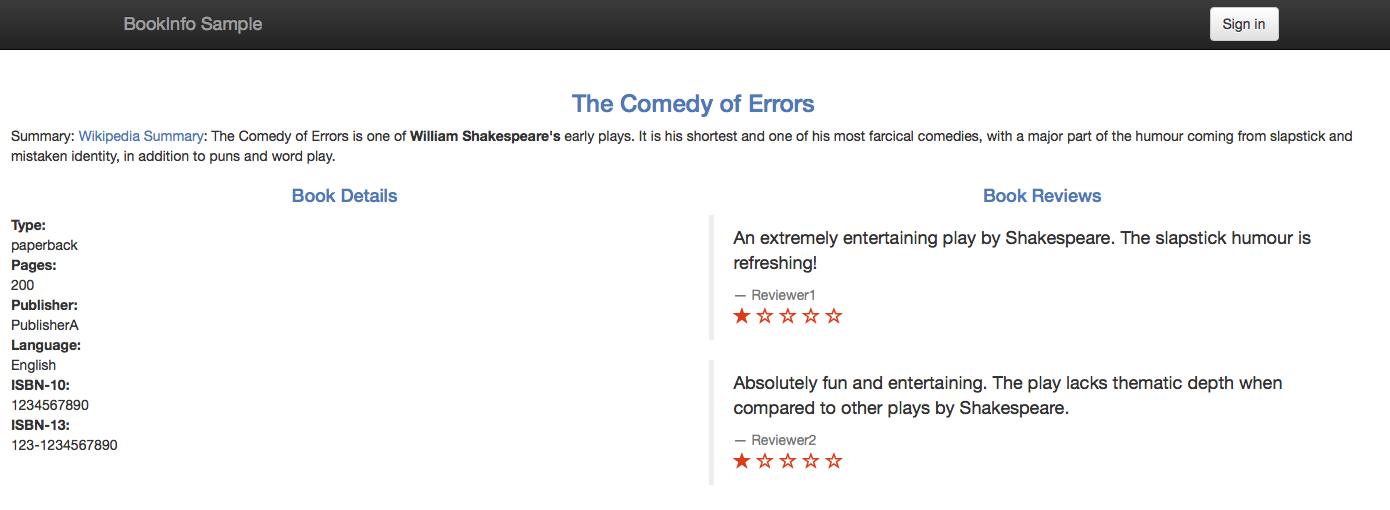
Book Ratings Displayed Correctly
请注意,和预期的一样,您会看到两个显示评论的一星评级。您将评级设置为一星,以作为外部数据库确实被使用了的视觉证据。
- 如果要通过出口网关引导流量,请继续下一节。否则,请执行 cleanup.
通过 egress gateway 定向 TCP Egress 流量
在本节中,您将处理通过 egress gateway 定向流量的情况。Sidecar 代理通过匹配 MongoDB 主机的 IP 地址(一个 32 位长度的 CIDR 块),将 TCP 连接从 MongoDB 客户端路由到 egress gateway。Egress gateway 按照其 hostname,转发流量到 MongoDB 主机。
如果您未执行上一节中的步骤,则立即执行这些步骤。
您可能希望启用 sidecar 代理和 MongoDB 客户端之间以及 egress gateway 的 mutual TLS Authentication,以使 egress gateway 监控来源 pod 的身份并基于该 identity 启用 Mixer 策略。启用双向 TLS 时同样对流量进行了加密。 如果你不想开启双向 TLS,参考 Mutual TLS between the sidecar proxies and the egress gateway 小节 否则,请继续以下部分。
配置从 sidecar 到 egress gateway 的 TCP 流量
定义
EGRESS_GATEWAY_MONGODB_PORT环境变量来保存用于通过 egress gateway 定向流量的端口,例如7777。必须选择没有被网格中其余 service 使用的端口。$ export EGRESS_GATEWAY_MONGODB_PORT=7777添加选择的端口到
istio-egressgatewayservice。您需要使用和安装 Istio 时一样的端口,特别是必须指定前面配置istio-egressgateway的所有端口。$ helm template install/kubernetes/helm/istio/ --name istio-egressgateway --namespace istio-system -x charts/gateways/templates/deployment.yaml -x charts/gateways/templates/service.yaml --set gateways.istio-ingressgateway.enabled=false --set gateways.istio-egressgateway.enabled=true --set gateways.istio-egressgateway.ports[0].port=80 --set gateways.istio-egressgateway.ports[0].name=http --set gateways.istio-egressgateway.ports[1].port=443 --set gateways.istio-egressgateway.ports[1].name=https --set gateways.istio-egressgateway.ports[2].port=$EGRESS_GATEWAY_MONGODB_PORT --set gateways.istio-egressgateway.ports[2].name=mongo | kubectl apply -f -检查
istio-egressgatewayservice 确实有选择的端口:$ kubectl get svc istio-egressgateway -n istio-system NAME TYPE CLUSTER-IP EXTERNAL-IP PORT(S) AGE istio-egressgateway ClusterIP 172.21.202.204 <none> 80/TCP,443/TCP,7777/TCP 34d为
istio-egressgateway服务 关闭双向 TLS 认证$ kubectl apply -f - <<EOF apiVersion: authentication.istio.io/v1alpha1 kind: Policy metadata: name: istio-egressgateway namespace: istio-system spec: targets: - name: istio-egressgateway EOF为您的 MongoDB service 创建一个 egress
Gateway、一个 destination rules 和 virtual services,以定向流量到 egress gateway,并从 egress gateway 发送到外部服务。$ kubectl apply -f - <<EOF apiVersion: networking.istio.io/v1alpha3 kind: Gateway metadata: name: istio-egressgateway spec: selector: istio: egressgateway servers: - port: number: $EGRESS_GATEWAY_MONGODB_PORT name: tcp protocol: TCP hosts: - my-mongo.tcp.svc --- apiVersion: networking.istio.io/v1alpha3 kind: DestinationRule metadata: name: egressgateway-for-mongo spec: host: istio-egressgateway.istio-system.svc.cluster.local subsets: - name: mongo --- apiVersion: networking.istio.io/v1alpha3 kind: DestinationRule metadata: name: mongo spec: host: my-mongo.tcp.svc --- apiVersion: networking.istio.io/v1alpha3 kind: VirtualService metadata: name: direct-mongo-through-egress-gateway spec: hosts: - my-mongo.tcp.svc gateways: - mesh - istio-egressgateway tcp: - match: - gateways: - mesh destinationSubnets: - $MONGODB_IP/32 port: $MONGODB_PORT route: - destination: host: istio-egressgateway.istio-system.svc.cluster.local subset: mongo port: number: $EGRESS_GATEWAY_MONGODB_PORT - match: - gateways: - istio-egressgateway port: $EGRESS_GATEWAY_MONGODB_PORT route: - destination: host: my-mongo.tcp.svc port: number: $MONGODB_PORT weight: 100 EOF
Sidecar 代理和 egress gateway 之间的双向 TLS
删除前面小节中的配置:
$ kubectl delete gateway istio-egressgateway --ignore-not-found=true
$ kubectl delete virtualservice direct-mongo-through-egress-gateway --ignore-not-found=true
$ kubectl delete destinationrule egressgateway-for-mongo mongo --ignore-not-found=true
$ kubectl delete policy istio-egressgateway -n istio-system --ignore-not-found=true
Enforce mutual TLS authentication for the
istio-egressgatewayservice:$ kubectl apply -f - <<EOF apiVersion: authentication.istio.io/v1alpha1 kind: Policy metadata: name: istio-egressgateway namespace: istio-system spec: targets: - name: istio-egressgateway peers: - mtls: {} EOF为您的 MongoDB service 创建一个 egress
Gateway、一个 destination rules 和 virtual services,以定向流量到 egress gateway,并从 egress gateway 发送到外部服务。$ kubectl apply -f - <<EOF apiVersion: networking.istio.io/v1alpha3 kind: Gateway metadata: name: istio-egressgateway spec: selector: istio: egressgateway servers: - port: number: 443 name: tls protocol: TLS hosts: - my-mongo.tcp.svc tls: mode: MUTUAL serverCertificate: /etc/certs/cert-chain.pem privateKey: /etc/certs/key.pem caCertificates: /etc/certs/root-cert.pem --- apiVersion: networking.istio.io/v1alpha3 kind: DestinationRule metadata: name: egressgateway-for-mongo spec: host: istio-egressgateway.istio-system.svc.cluster.local subsets: - name: mongo trafficPolicy: loadBalancer: simple: ROUND_ROBIN portLevelSettings: - port: number: 443 tls: mode: ISTIO_MUTUAL sni: my-mongo.tcp.svc --- apiVersion: networking.istio.io/v1alpha3 kind: DestinationRule metadata: name: mongo spec: host: my-mongo.tcp.svc --- apiVersion: networking.istio.io/v1alpha3 kind: VirtualService metadata: name: direct-mongo-through-egress-gateway spec: hosts: - my-mongo.tcp.svc gateways: - mesh - istio-egressgateway tcp: - match: - gateways: - mesh destinationSubnets: - $MONGODB_IP/32 port: $MONGODB_PORT route: - destination: host: istio-egressgateway.istio-system.svc.cluster.local subset: mongo port: number: 443 - match: - gateways: - istio-egressgateway port: 443 route: - destination: host: my-mongo.tcp.svc port: number: $MONGODB_PORT weight: 100 EOF继续下一节。
验证 TCP egress 流量是否通过 egress gateway 定向
再次刷新应用程序的网页,并验证等级是否仍正确显示。
检查 egress gateway 的 Envoy 的统计数据,找到对应请求 MongoDB service 的 counter。如果 Istio 步骤在
istio-systemnamespace 中,打印 counter 的命令为:$ kubectl logs -l istio=egressgateway -n istio-system [2019-04-14T06:12:07.636Z] "- - -" 0 - "-" 1591 4393 94 - "-" "-" "-" "-" "<Your MongoDB IP>:<your MongoDB port>" outbound|<your MongoDB port>||my-mongo.tcp.svc 172.30.146.119:59924 172.30.146.119:443 172.30.230.1:59206 -
清理通过 egress gateway 定向 TCP egress 流量的配置
$ kubectl delete serviceentry mongo
$ kubectl delete gateway istio-egressgateway --ignore-not-found=true
$ kubectl delete virtualservice direct-mongo-through-egress-gateway --ignore-not-found=true
$ kubectl delete destinationrule egressgateway-for-mongo mongo --ignore-not-found=true
$ kubectl delete policy istio-egressgateway -n istio-system --ignore-not-found=true
TLS egress 控制
在现实生活中,绝大多数到外部服务的通信都必须被加密,而 MongoDB 协议在 TLS 之上运行。
并且,TLS 客户端经常发送服务器名称指示,SNI,作为握手的一部分。
如果您的 MongoDB 服务器运行 TLS 且 MongoDB 客户端发送 SNI 作为握手的一部分,您就可以像任何其余带有 SNI 的 TLS 流量一样控制 MongoDB egress 流量。
您不需要指定 MongoDB 服务器的 IP 地址,而只需指定他们的主机名称,这样会更加方便,因为您无需依赖 IP 地址的稳定性。
您还可以指定通配符为主机名的前缀,例如允许从 *.com 域访问任意服务器。
要想检查您的 MongoDB 服务器是否支持 TLS,请运行:
$ openssl s_client -connect $MONGODB_HOST:$MONGODB_PORT -servername $MONGODB_HOST
如果上述命令打印了一个服务器返回的证书,说明该服务器支持 TLS。如果没有,您就需要像前面小节描述的一样在 TCP 层面控制 MongoDB egress 流量。
无 gateway 情况下控制 TLS egress 流量
如果您不需要 egress gateway,请遵循本小节中的说明。 如果您需要通过 egress gateway 定向流量,请继续阅读通过 egress gateway 定向 TCP Egress 流量。
为 MongoDB service 创建一个
ServiceEntry:$ kubectl apply -f - <<EOF apiVersion: networking.istio.io/v1alpha3 kind: ServiceEntry metadata: name: mongo spec: hosts: - $MONGODB_HOST ports: - number: $MONGODB_PORT name: tls protocol: TLS resolution: DNS EOF刷新应用程序的网页。应用程序应该正确显示评级数据。
清理 TLS 的 egress 配置
$ kubectl delete serviceentry mongo
通过 egress gateway 定向 TLS Egress 流量
在本小节中,您将处理通过 egress gateway 定向流量的情况。 Sidecar 代理通过匹配 MongoDB 主机的 SNI,将 TLS 连接从 MongoDB 客户端路由到 egress gateway。 Egress gateway 再将流量转发到 MongoDB 主机。请注意,sidecar 代理会将目的端口重写为 443。 Egress gateway 在 443 端口上接受 MongoDB 流量,按照 SNI 匹配 MongoDB 主机,并再次将端口重写为 MongoDB 服务器的端口。
为 MongoDB service 创建一个
ServiceEntry:$ kubectl apply -f - <<EOF apiVersion: networking.istio.io/v1alpha3 kind: ServiceEntry metadata: name: mongo spec: hosts: - $MONGODB_HOST ports: - number: $MONGODB_PORT name: tls protocol: TLS - number: 443 name: tls-port-for-egress-gateway protocol: TLS resolution: DNS location: MESH_EXTERNAL EOF刷新应用程序的网页并验证评级数据是否显示正常。
为您的 MongoDB service 创建一个 egress
Gateway、一个 destination rules 和 virtual services,以将流量定向到 egress gateway,并从 egress gateway 发送到外部服务。如果您希望启用 sidecar 代理和应用程序 pod 以及 egress gateway 之间的双向 TLS 认证,可以使用下面的命令。(您可能希望启用双向 TLS 以使 egress gateway 监控来源 pod 的身份并基于该 identity 启用 Mixer 策略。)
$ kubectl apply -f - <<EOF
apiVersion: networking.istio.io/v1alpha3
kind: Gateway
metadata:
  name: istio-egressgateway
spec:
  selector:
istio: egressgateway
  servers:
  - port:
  number: 443
  name: tls
  protocol: TLS
hosts:
- $MONGODB_HOST
tls:
  mode: MUTUAL
  serverCertificate: /etc/certs/cert-chain.pem
  privateKey: /etc/certs/key.pem
  caCertificates: /etc/certs/root-cert.pem
---
apiVersion: networking.istio.io/v1alpha3
kind: DestinationRule
metadata:
  name: egressgateway-for-mongo
spec:
  host: istio-egressgateway.istio-system.svc.cluster.local
  subsets:
  - name: mongo
trafficPolicy:
  loadBalancer:
    simple: ROUND_ROBIN
  portLevelSettings:
  - port:
      number: 443
    tls:
      mode: ISTIO_MUTUAL
      sni: $MONGODB_HOST
---
apiVersion: networking.istio.io/v1alpha3
kind: VirtualService
metadata:
  name: direct-mongo-through-egress-gateway
spec:
  hosts:
  - $MONGODB_HOST
  gateways:
  - mesh
  - istio-egressgateway
  tls:
  - match:
- gateways:
  - mesh
  port: $MONGODB_PORT
  sni_hosts:
  - $MONGODB_HOST
route:
- destination:
    host: istio-egressgateway.istio-system.svc.cluster.local
    subset: mongo
    port:
      number: 443
  tcp:
  - match:
- gateways:
  - istio-egressgateway
  port: 443
route:
- destination:
    host: $MONGODB_HOST
    port:
      number: $MONGODB_PORT
  weight: 100
EOF
$ kubectl apply -f - <<EOF apiVersion: networking.istio.io/v1alpha3 kind: Gateway metadata: name: istio-egressgateway spec: selector: istio: egressgateway servers: - port: number: 443 name: tls protocol: TLS hosts: - $MONGODB_HOST tls: mode: PASSTHROUGH --- apiVersion: networking.istio.io/v1alpha3 kind: DestinationRule metadata: name: egressgateway-for-mongo spec: host: istio-egressgateway.istio-system.svc.cluster.local subsets: - name: mongo --- apiVersion: networking.istio.io/v1alpha3 kind: VirtualService metadata: name: direct-mongo-through-egress-gateway spec: hosts: - $MONGODB_HOST gateways: - mesh - istio-egressgateway tls: - match: - gateways: - mesh port: $MONGODB_PORT sni_hosts: - $MONGODB_HOST route: - destination: host: istio-egressgateway.istio-system.svc.cluster.local subset: mongo port: number: 443 - match: - gateways: - istio-egressgateway port: 443 sni_hosts: - $MONGODB_HOST route: - destination: host: $MONGODB_HOST port: number: $MONGODB_PORT weight: 100 EOF
清除通过 egress gateway 定向 TLS Egress 流量的配置
$ kubectl delete serviceentry mongo
$ kubectl delete gateway istio-egressgateway
$ kubectl delete virtualservice direct-mongo-through-egress-gateway
$ kubectl delete destinationrule egressgateway-for-mongo
启用到任意通配符域名的 MongoDB TLS egress 流量
有时,您希望将 egress 流量配置为来自同一域的多个主机名,例如到 *.<your company domain>.com 中的所有 MongoDB service。
您不希望创建多个配置项,而是一个用于公司中所有 MongoDB service 的通用配置项。
要想通过一个配置来控制到所有相同域中的外部服务的访问,您需要使用 通配符 主机。
在本节中,您将为通配符域名配置 egress gateway。我在 composedb.com 处使用了 MongoDB instance,
因此为 *.com 配置出口流量对我有效(我也可以使用*.composedb.com)。
您可以根据 MongoDB 主机选择通配符域名。
要为通配符域名配置 egress gateway 流量, 您需要使用一个额外的 SNI 代理来部署一个自定义的 egress gateway。由于 Envoy(Istio egress gateway 使用的标准代理)目前的限制,这是必须的。
准备一个 SNI 代理使用新的 egress gateway
在本节中,除了标准的 Istio Envoy 代理之外,您还将部署具有 SNI 代理的 egress gateway。您可以使用任何能够根据任意未预先配置的 SNI 值路由流量的 SNI 代理;我们使用 Nginx 来实现这一功能。
为 Nginx SNI 代理创建配置文件。如果需要,您可以编辑该文件以指定其他 Nginx 设置。
$ cat <<EOF > ./sni-proxy.conf
user www-data;

events {
}

stream {
  log_format log_stream '\$remote_addr [\$time_local] \$protocol [\$ssl_preread_server_name]'
  '\$status \$bytes_sent \$bytes_received \$session_time';

  access_log /var/log/nginx/access.log log_stream;
  error_log  /var/log/nginx/error.log;

  # tcp forward proxy by SNI
  server {
    resolver 8.8.8.8 ipv6=off;
    listen       127.0.0.1:$MONGODB_PORT;
    proxy_pass   \$ssl_preread_server_name:$MONGODB_PORT;
    ssl_preread  on;
  }
}
EOF
创建一个 Kubernetes ConfigMap 来保存 Nginx SNI 代理的配置:
$ kubectl create configmap egress-sni-proxy-configmap -n istio-system --from-file=nginx.conf=./sni-proxy.conf下面的命令将产生用于编辑和部署的
istio-egressgateway-with-sni-proxy.yaml文件。$ cat <<EOF | helm template install/kubernetes/helm/istio/ --name istio-egressgateway-with-sni-proxy --namespace istio-system -x charts/gateways/templates/deployment.yaml -x charts/gateways/templates/service.yaml -x charts/gateways/templates/serviceaccount.yaml -x charts/gateways/templates/autoscale.yaml -x charts/gateways/templates/role.yaml -x charts/gateways/templates/rolebindings.yaml --set global.mtls.enabled=true --set global.istioNamespace=istio-system -f - > ./istio-egressgateway-with-sni-proxy.yaml gateways: enabled: true istio-ingressgateway: enabled: false istio-egressgateway: enabled: false istio-egressgateway-with-sni-proxy: enabled: true labels: app: istio-egressgateway-with-sni-proxy istio: egressgateway-with-sni-proxy replicaCount: 1 autoscaleMin: 1 autoscaleMax: 5 cpu: targetAverageUtilization: 80 serviceAnnotations: {} type: ClusterIP ports: - port: 443 name: https secretVolumes: - name: egressgateway-certs secretName: istio-egressgateway-certs mountPath: /etc/istio/egressgateway-certs - name: egressgateway-ca-certs secretName: istio-egressgateway-ca-certs mountPath: /etc/istio/egressgateway-ca-certs configVolumes: - name: sni-proxy-config configMapName: egress-sni-proxy-configmap additionalContainers: - name: sni-proxy image: nginx volumeMounts: - name: sni-proxy-config mountPath: /etc/nginx readOnly: true EOF部署新的 egress gateway:
$ kubectl apply -f ./istio-egressgateway-with-sni-proxy.yaml
serviceaccount "istio-egressgateway-with-sni-proxy-service-account" created
role "istio-egressgateway-with-sni-proxy-istio-system" created
rolebinding "istio-egressgateway-with-sni-proxy-istio-system" created
service "istio-egressgateway-with-sni-proxy" created
deployment "istio-egressgateway-with-sni-proxy" created
horizontalpodautoscaler "istio-egressgateway-with-sni-proxy" created
验证新 egress gateway 是否工作正常。请注意 pod 有两个容器(一个是 Envoy 代理,另一个是 SNI 代理)。
$ kubectl get pod -l istio=egressgateway-with-sni-proxy -n istio-system
NAME                                                  READY     STATUS    RESTARTS   AGE
istio-egressgateway-with-sni-proxy-79f6744569-pf9t2   2/2       Running   0          17s
创建一个使用静态地址 127.0.0.1 (
localhost) 的 service entry,并对定向到新 service entry 的流量禁用双向 TLS:$ kubectl apply -f - <<EOF apiVersion: networking.istio.io/v1alpha3 kind: ServiceEntry metadata: name: sni-proxy spec: hosts: - sni-proxy.local location: MESH_EXTERNAL ports: - number: $MONGODB_PORT name: tcp protocol: TCP resolution: STATIC endpoints: - address: 127.0.0.1 --- apiVersion: networking.istio.io/v1alpha3 kind: DestinationRule metadata: name: disable-mtls-for-sni-proxy spec: host: sni-proxy.local trafficPolicy: tls: mode: DISABLE EOF
使用新 egress gateway 配置到 *.com 的访问
为
*.com定义一个ServiceEntry:$ cat <<EOF | kubectl create -f - apiVersion: networking.istio.io/v1alpha3 kind: ServiceEntry metadata: name: mongo spec: hosts: - "*.com" ports: - number: 443 name: tls protocol: TLS - number: $MONGODB_PORT name: tls-mongodb protocol: TLS location: MESH_EXTERNAL EOF为 *.com 创建一个 egress Gateway,使用 443 端口和 TLS 协议。创建一个 destination rule 来为 gateway 设置 SNI。 以及为 Envoy 过滤器,以防止恶意应用程序篡改 SNI (过滤器验证这个应用程序发布的 SNI 与报告给 Mixer 的 SNI 是否相同)
$ kubectl apply -f - <<EOF
apiVersion: networking.istio.io/v1alpha3
kind: Gateway
metadata:
  name: istio-egressgateway-with-sni-proxy
spec:
  selector:
    istio: egressgateway-with-sni-proxy
  servers:
  - port:
      number: 443
      name: tls
      protocol: TLS
    hosts:
    - "*.com"
    tls:
      mode: MUTUAL
      serverCertificate: /etc/certs/cert-chain.pem
      privateKey: /etc/certs/key.pem
      caCertificates: /etc/certs/root-cert.pem
---
apiVersion: networking.istio.io/v1alpha3
kind: DestinationRule
metadata:
  name: mtls-for-egress-gateway
spec:
  host: istio-egressgateway-with-sni-proxy.istio-system.svc.cluster.local
  subsets:
    - name: mongo
      trafficPolicy:
        loadBalancer:
          simple: ROUND_ROBIN
        portLevelSettings:
        - port:
            number: 443
          tls:
            mode: ISTIO_MUTUAL
---
# The following filter is used to forward the original SNI (sent by the application) as the SNI of the mutual TLS
# connection.
# The forwarded SNI will be reported to Mixer so that policies will be enforced based on the original SNI value.
apiVersion: networking.istio.io/v1alpha3
kind: EnvoyFilter
metadata:
  name: forward-downstream-sni
spec:
  filters:
  - listenerMatch:
      portNumber: $MONGODB_PORT
      listenerType: SIDECAR_OUTBOUND
    filterName: forward_downstream_sni
    filterType: NETWORK
    filterConfig: {}
---
# The following filter verifies that the SNI of the mutual TLS connection (the SNI reported to Mixer) is
# identical to the original SNI issued by the application (the SNI used for routing by the SNI proxy).
# The filter prevents Mixer from being deceived by a malicious application: routing to one SNI while
# reporting some other value of SNI. If the original SNI does not match the SNI of the mutual TLS connection, the
# filter will block the connection to the external service.
apiVersion: networking.istio.io/v1alpha3
kind: EnvoyFilter
metadata:
  name: egress-gateway-sni-verifier
spec:
  workloadLabels:
    app: istio-egressgateway-with-sni-proxy
  filters:
  - listenerMatch:
      portNumber: 443
      listenerType: GATEWAY
    filterName: sni_verifier
    filterType: NETWORK
    filterConfig: {}
EOF
将目的为 *.com 的流量路由到 egress gateway,并从 egress gateway 路由到 SNI 代理.
$ kubectl apply -f - <<EOF
apiVersion: networking.istio.io/v1alpha3
kind: VirtualService
metadata:
  name: direct-mongo-through-egress-gateway
spec:
  hosts:
  - "*.com"
  gateways:
  - mesh
  - istio-egressgateway-with-sni-proxy
  tls:
  - match:
    - gateways:
      - mesh
      port: $MONGODB_PORT
      sni_hosts:
      - "*.com"
    route:
    - destination:
        host: istio-egressgateway-with-sni-proxy.istio-system.svc.cluster.local
        subset: mongo
        port:
          number: 443
      weight: 100
  tcp:
  - match:
    - gateways:
      - istio-egressgateway-with-sni-proxy
      port: 443
    route:
    - destination:
        host: sni-proxy.local
        port:
          number: $MONGODB_PORT
      weight: 100
EOF
再次刷新应用程序的网页,验证评级数据仍然显示正确。
检查 egress gateway 的 Envoy 的日志。如果 Istio 部署在
istio-systemnamespace 中,打印日志的的命令为:$ kubectl logs -l istio=egressgateway-with-sni-proxy -c istio-proxy -n istio-systemYou should see lines similar to the following:
[2019-01-02T17:22:04.602Z] "- - -" 0 - 768 1863 88 - "-" "-" "-" "-" "127.0.0.1:28543" outbound|28543||sni-proxy.local 127.0.0.1:49976 172.30.146.115:443 172.30.146.118:58510 <your MongoDB host>
[2019-01-02T17:22:04.713Z] "- - -" 0 - 1534 2590 85 - "-" "-" "-" "-" "127.0.0.1:28543" outbound|28543||sni-proxy.local 127.0.0.1:49988 172.30.146.115:443 172.30.146.118:58522 <your MongoDB host>
检查 SNI 代理的日志。如果 Istio 部署在
istio-systemnamespace 中,打印日志的命令为:$ kubectl logs -l istio=egressgateway-with-sni-proxy -n istio-system -c sni-proxy 127.0.0.1 [23/Aug/2018:03:28:18 +0000] TCP [<your MongoDB host>]200 1863 482 0.089 127.0.0.1 [23/Aug/2018:03:28:18 +0000] TCP [<your MongoDB host>]200 2590 1248 0.095
理解原理
在本节中,您使用通配符域名为您的 MongoDB 主机配置了 egress 流量。对于单个 MongoDB 主机使用通配符域名没有任何好处(可以指定确切的主机名),
而当集群中的应用程序需要访问多个匹配某个通配符域名的 MongoDB 主机时可能有用。
例如,如果应用程序需要访问 mongodb1.composedb.com、mongodb2.composedb.com 和 mongodb3.composedb.com 时,
egress 流量可以使用针对泛域名 *.composedb.com 的单个配置实现。
当配置一个应用使用另一个主机名匹配本小节中的通配符域名的 MongoDB 实例时,不需要额外的 Istio 配置。 我将这留作一个练习,让读者自行验证。
清理到任意通配符域名的 MongoDB TLS egress 流量的配置
删除针对
*.com的配置项:$ kubectl delete serviceentry mongo $ kubectl delete gateway istio-egressgateway-with-sni-proxy $ kubectl delete virtualservice direct-mongo-through-egress-gateway $ kubectl delete destinationrule mtls-for-egress-gateway $ kubectl delete envoyfilter forward-downstream-sni egress-gateway-sni-verifier删除
egressgateway-with-sni-proxyDeployment的配置项:$ kubectl delete serviceentry sni-proxy $ kubectl delete destinationrule disable-mtls-for-sni-proxy $ kubectl delete -f ./istio-egressgateway-with-sni-proxy.yaml $ kubectl delete configmap egress-sni-proxy-configmap -n istio-system删除您创建的配置文件:
$ rm ./istio-egressgateway-with-sni-proxy.yaml
$ rm ./nginx-sni-proxy.conf
清理
删除
bookinfo用户:$ cat <<EOF | mongo --ssl --sslAllowInvalidCertificates $MONGODB_HOST:$MONGODB_PORT -u admin -p $MONGO_ADMIN_PASSWORD --authenticationDatabase admin use test db.dropUser("bookinfo"); EOF删除
ratings集合:$ cat <<EOF | mongo --ssl --sslAllowInvalidCertificates $MONGODB_HOST:$MONGODB_PORT -u admin -p $MONGO_ADMIN_PASSWORD --authenticationDatabase admin use test db.ratings.drop(); EOF取消您使用的环境变量:
$ unset MONGO_ADMIN_PASSWORD BOOKINFO_PASSWORD MONGODB_HOST MONGODB_PORT MONGODB_IP删除 virtual services:
$ kubectl delete -f @samples/bookinfo/networking/virtual-service-ratings-db.yaml@
Deleted config: virtual-service/default/reviews
Deleted config: virtual-service/default/ratings
删除
ratings v2-mongodbdeployment:$ kubectl delete -f @samples/bookinfo/platform/kube/bookinfo-ratings-v2.yaml@ deployment "ratings-v2" deleted
总结
在这篇博文中,我演示了 MongoDB egress 流量控制的各种选项。您可以在 TCP 或 TLS 层面上控制 MongoDB egress 流量。
根据您的组织的安全需求,在 TCP 和 TLS 场景下您都可以将流量从 sidecar 代理定向到外部 MongoDB 主机
,或者通过一个 egress gateway 进行转发。在后面一种场景中,您还可以决定是否禁用 sidecar 代理到 egress gateway 的双向 TLS 认证。
如果您想要通过指定类似 *.com 的通配符域名来从 TLS 层面控制 MongoDB 的 egress 流量,并且通过 egress gateway 定向流量时,
您必须部署一个使用 SNI 代理的自定义 egress gateway。
请注意,本博客文章中描述的 MongoDB 配置和注意事项与 TCP/TLS 之上的其他非 HTTP 协议相同。
Share this blog on social!


