Introducing Rust-Based Ztunnel for Istio Ambient Service Mesh
A purpose-built per-node proxy for Istio ambient mesh.
The ztunnel (zero trust tunnel) component is a purpose-built per-node proxy for Istio ambient mesh. It is responsible for securely connecting and authenticating workloads within ambient mesh. Ztunnel is designed to focus on a small set of features for your workloads in ambient mesh such as mTLS, authentication, L4 authorization and telemetry, without terminating workload HTTP traffic or parsing workload HTTP headers. The ztunnel ensures traffic is efficiently and securely transported to the waypoint proxies, where the full suite of Istio’s functionality, such as HTTP telemetry and load balancing, is implemented.
Because ztunnel is designed to run on all of your Kubernetes worker nodes, it is critical to keep its resource footprint small. Ztunnel is designed to be an invisible (or “ambient”) part of your service mesh with minimal impact on your workloads.
Ztunnel architecture
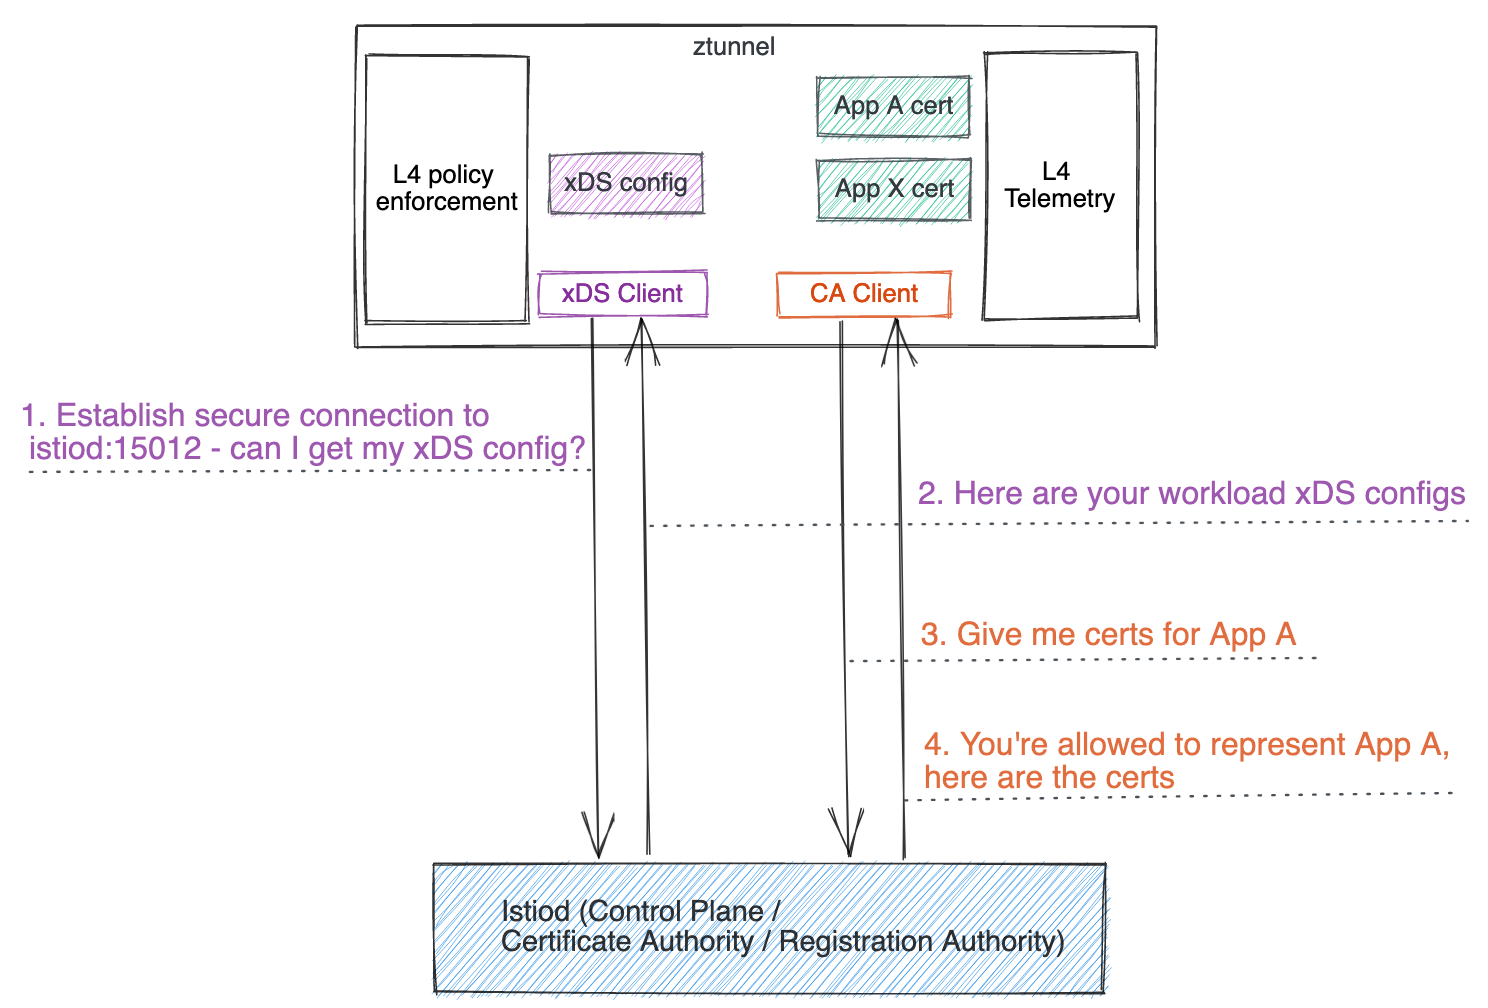
Similar to sidecars, ztunnel also serves as an xDS client and CA client:
- During startup, it securely connects to the Istiod control plane using its service account token. Once the connection from ztunnel to Istiod is established securely using TLS, it starts to fetch xDS configuration as an xDS client. This works similarly to sidecars or gateways or waypoint proxies, except that Istiod recognizes the request from ztunnel and sends the purpose-built xDS configuration for ztunnel, which you will learn more about soon.
- It also serves as a CA client to manage and provision mTLS certificates on behalf of all co-located workloads it manages.
- As traffic comes in or goes out, it serves as a core proxy that handles the inbound and outbound traffic (either out-of-mesh plain text or in-mesh HBONE) for all co-located workloads it manages.
- It provides L4 telemetry (metrics and logs) along with an admin server with debugging information to help you debug ztunnel if needed.
Why not reuse Envoy?
When Istio ambient service mesh was announced on Sept 7, 2022, the ztunnel was implemented using an Envoy proxy. Given that we use Envoy for the rest of Istio - sidecars, gateways, and waypoint proxies - it was natural for us to start implementing ztunnel using Envoy.
However, we found that while Envoy was a great fit for other use cases, it was challenging to implement ztunnel in Envoy, as many of the tradeoffs, requirements, and use cases are dramatically different than that of a sidecar proxy or ingress gateway. In addition, most of the things that make Envoy such a great fit for those other use cases, such as its rich L7 feature set and extensibility, went to waste in ztunnel which didn’t need those features.
A purpose-built ztunnel
After having trouble bending Envoy to our needs, we started investigating making a purpose-built implementation of the ztunnel. Our hypothesis was that by designing with a single focused use case in mind from the beginning, we could develop a solution that was simpler and more performant than molding a general purpose project to our bespoke use cases. The explicit decision to make ztunnel simple was key to this hypothesis; similar logic wouldn’t hold up to rewriting the gateway, for example, which has a huge list of supported features and integrations.
This purpose-built ztunnel involved two key areas:
- The configuration protocol between ztunnel and its Istiod
- The runtime implementation of ztunnel
Configuration protocol
Envoy proxies use the xDS Protocol for configuration. This is a key part of what makes Istio work well, offering rich and dynamic configuration updates. However, as we tread off the beaten path, the config becomes more and more bespoke, which means it’s much larger and more expensive to generate. In a sidecar, a single Service with 1 pod, generates roughly ~350 lines of xDS (in YAML), which already has been challenging to scale. The Envoy-based ztunnel was far worse, and in some areas had N^2 scaling attributes.
To keep the ztunnel configuration as small as possible, we investigated using a purpose built configuration protocol, that contains precisely the information we need (and nothing more), in an efficient format. For example, a single pod could be represented concisely:
name: helloworld-v1-55446d46d8-ntdbk
namespace: default
serviceAccount: helloworld
node: ambient-worker2
protocol: TCP
status: Healthy
waypointAddresses: []
workloadIp: 10.244.2.8
canonicalName: helloworld
canonicalRevision: v1
workloadName: helloworld-v1
workloadType: deployment
This information is transported over the xDS transport API, but uses a custom ambient-specific type. Refer to the workload xDS configuration section to learn more about the configuration details.
By having a purpose built API, we can push logic into the proxy instead of in Envoy configuration. For example, to configure mTLS in Envoy, we need to add an identical large set of configuration tuning the precise TLS settings for each service; with ztunnel, we need only a single enum to declare whether mTLS should be used or not. The rest of the complex logic is embedded directly into ztunnel code.
With this efficient API between Istiod and ztunnel, we found we could configure ztunnels with information about large meshes (such as those with 100,000 pods) with orders of magnitude less configuration, which means less CPU, memory, and network costs.
Runtime implementation
As the name suggests, ztunnel uses an HTTPS tunnel to carry users requests. While Envoy supports this tunneling, we found the configuration model limiting for our needs. Roughly speaking, Envoy operates by sending requests through a series of “filters”, starting with accepting a request and ending with sending a request. With our requirements, which have multiple layers of requests (the tunnel itself and the users’ requests), as well as a need to apply per-pod policy after load balancing, we found we would need to loop through these filters 4 times per connection when implementing our prior Envoy-based ztunnel. While Envoy has some optimizations for essentially “sending a request to itself” in memory, this was still very complex and expensive.
By building out our own implementation, we could design around these constraints from the ground up. In addition, we have more flexibility in all aspects of the design. For example, we could choose to share connections across threads or implement more bespoke requirements around isolation between service accounts. After establishing that a purpose built proxy was viable, we set out to choose the implementation details.
A Rust-based ztunnel
With the goal to make ztunnel fast, secure, and lightweight, Rust was an obvious choice. However, it wasn’t our first. Given Istio’s current extensive usage of Go, we had hoped we could make a Go-based implementation meet these goals. In initial prototypes, we built out some simple versions of both a Go-based implementation as well as a Rust-based one. From our tests, we found that the Go-based version didn’t meet our performance and footprint requirements. While it’s likely we could have optimized it further, we felt that a Rust-based proxy would give us the long-term optimal implementation.
A C++ implementation – likely reusing parts of Envoy – was also considered. However, this option was not pursued due to lack of memory safety, developer experience concerns, and a general industry trend towards Rust.
This process of elimination left us with Rust, which was a perfect fit. Rust has a strong history of success in high performance, low resource utilization applications, especially in network applications (including service mesh). We chose to build on top of the Tokio and Hyper libraries, two of the de-facto standards in the ecosystem that are extensively battle-tested and easy to write highly performant asynchronous code with.
A quick tour of the Rust-based ztunnel
Workload xDS configuration
The workload xDS configurations are very easy to understand and debug. You can view them by sending a request to localhost:15000/config_dump from one of your ztunnel pods, or use the convenient istioctl pc workload command. There are two key workload xDS configurations: workloads and policies.
Before your workloads are included in your ambient mesh, you will still be able to see them in ztunnel’s config dump, as ztunnel is aware of all of the workloads regardless of whether they are ambient enabled or not. For example, below contains a sample workload configuration for a newly deployed helloworld v1 pod which is out-of-mesh indicated by protocol: TCP:
{
  "workloads": {
    "10.244.2.8": {
      "workloadIp": "10.244.2.8",
      "protocol": "TCP",
      "name": "helloworld-v1-cross-node-55446d46d8-ntdbk",
      "namespace": "default",
      "serviceAccount": "helloworld",
      "workloadName": "helloworld-v1-cross-node",
      "workloadType": "deployment",
      "canonicalName": "helloworld",
      "canonicalRevision": "v1",
      "node": "ambient-worker2",
      "authorizationPolicies": [],
      "status": "Healthy"
    }
  }
}
After the pod is included in ambient (by labeling the namespace default with istio.io/dataplane-mode=ambient), the protocol value is replaced with HBONE, instructing ztunnel to upgrade all incoming and outgoing communications from the helloworld-v1 pod to be HBONE.
{
  "workloads": {
    "10.244.2.8": {
      "workloadIp": "10.244.2.8",
      "protocol": "HBONE",
      ...
}
After you deploy any workload level authorization policy, the policy configuration will be pushed as xDS configuration from Istiod to ztunnel and shown under policies:
{
  "policies": {
    "default/hw-viewer": {
      "name": "hw-viewer",
      "namespace": "default",
      "scope": "WorkloadSelector",
      "action": "Allow",
      "groups": [[[{
        "principals": [{"Exact": "cluster.local/ns/default/sa/sleep"}]
      }]]]
    }
  }
  ...
}
You’ll also notice the workload’s configuration is updated with reference to the authorization policy.
{
  "workloads": {
    "10.244.2.8": {
    "workloadIp": "10.244.2.8",
    ...
    "authorizationPolicies": [
        "default/hw-viewer"
    ],
  }
  ...
}
L4 telemetry provided by ztunnel
You may be pleasantly surprised that the ztunnel logs are easy to understand. For example, you’ll see the HTTP Connect request on the destination ztunnel that indicates the source pod IP (peer_ip) and destination pod IP.
2023-02-15T20:40:48.628251Z INFO inbound{id=4399fa68cf25b8ebccd472d320ba733f peer_ip=10.244.2.5 peer_id=spiffe://cluster.local/ns/default/sa/sleep}: ztunnel::proxy::inbound: got CONNECT request to 10.244.2.8:5000You can view L4 metrics of your workloads by accessing the localhost:15020/metrics API which provides the full set of TCP standard metrics, with same labels that sidecars expose. For example:
istio_tcp_connections_opened_total{
reporter="source",
source_workload="sleep",
source_workload_namespace="default",
source_principal="spiffe://cluster.local/ns/default/sa/sleep",
destination_workload="helloworld-v1",
destination_workload_namespace="default",
destination_principal="spiffe://cluster.local/ns/default/sa/helloworld",
request_protocol="tcp",
connection_security_policy="mutual_tls"
...
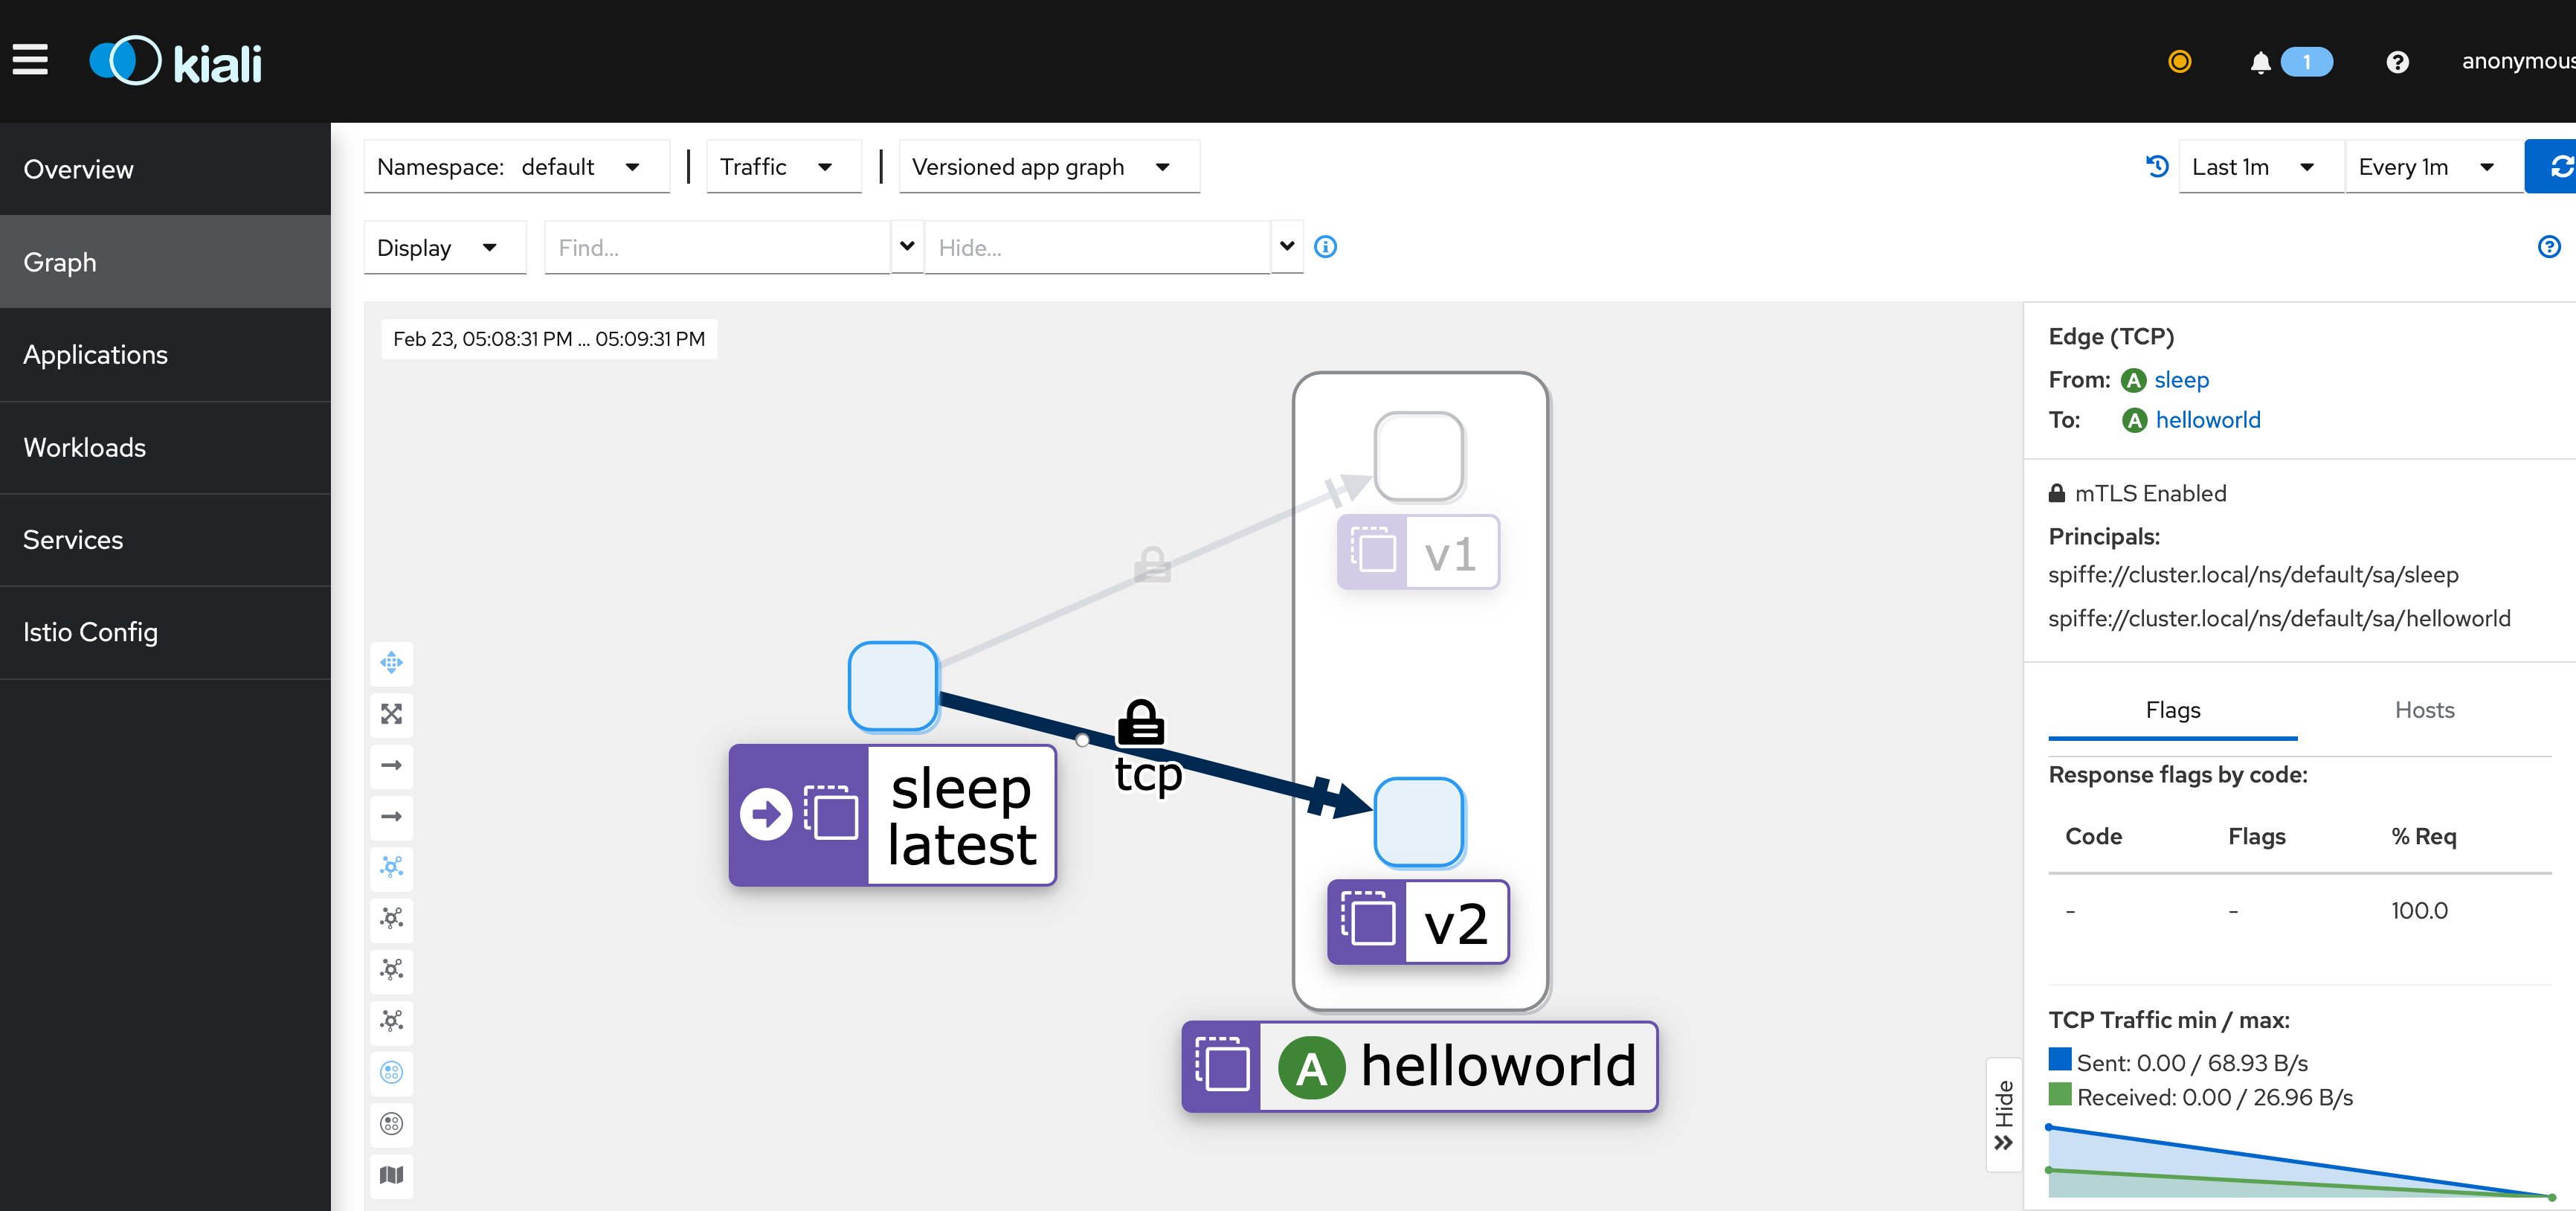
} 1If you install Prometheus and Kiali, you can view these metrics easily from Kiali’s UI.
Wrapping up
We are super excited that the new Rust-based ztunnel is drastically simplified, more lightweight and performant than the prior Envoy-based ztunnel. With the purposefully designed workload xDS for the Rust-based ztunnel, you’ll not only be able to understand the xDS configuration much more easily, but also have drastically reduced network traffic and cost between the Istiod control plane and ztunnels. With Istio ambient now merged to upstream master, you can try the new Rust-based ztunnel by following our getting started guide.


